Baking up another batch of carrot cupcakes today for my niece's birthday. She personally requested it. I suspect not so much for the cake, more for the icing.
And I couldn't find the recipe for the Cream Cheese icing from CI. The one that they added buttermilk powder to stiff it up. I love cream cheese icing, who doesn't, but it's always been too soft for piping on cupcakes. Until this frosting recipe from CI.
I thought I already put the recipe here, given that I've made it only about hundreds of times. But nope. Had to dig through tons of copies of CI magazines to find the frosting recipe again. The carrot cake recipe is from The Cooking Photographer. Everyone loves that carrot cake, so I'm keeping it.
Carrot Cake
2 cups all purpose flour
2 tsp baking soda
2 tsp cinnamon
1/2 tsp salt
3 eggs
3/4 cup oil
3/4 cup buttermilk
2 cups sugar
2 tsp vanilla extract
1 8-oz can crushed pineapple
2 cups shredded carrot
1 cup unsweetened coconut
1 cup chopped nuts.
For cupcakes, bake at 350F for 18-22 minutes.
Frosting
16 Tbsp unsalted butter, softened
3 cups (12 ounces) confectioners' sugar
1/3 cup buttermilk powder
2 tsp vanilla extract
1/4 tsp salt
12 ounces cream cheese, chilled and cut into 12 equal pieces
Friday, December 7, 2012
Galbi / Kalbi
This Galbi recipe was so good. My son, the extremely picky eater, liked it a lot. He's the foodie in the family. This recipe is definitely a keeper. I'll make it again and post pictures then, maybe.
5 pounds Korean style beef short ribs
1 cup brown sugar, packed
1 cup soy sauce
1/2 cup water
1/4 cup mirin (rice wine)
1 small onion, peeled and finely grated
1 small Asian pear or Bosc pear, peeled and finely grated
4 tablespoons minced garlic
2 tablespoons dark sesame oil
1/4 teaspoon black pepper
2 green onions, thinly sliced (optional)
1 tablespoon grated ginger.
Sprinkle brown sugar over beef and mix well to evenly coat. Let sit at room temperature for 10 minutes while preparing marinade.
In a bowl, whisk together remaining ingredients. Transfer beef into a large sealable freezer bag. Add marinade, press out excess air from bags, and seal. Turn bag over several times to ensure beef is evenly coated.
Refrigerate for at least 4 hours but preferably overnight.
Heat gas or charcoal grill to medium-hot. Drain excess marinade off beef. Grill short ribs, turning once, to desired doneness, about 3 to 4 minutes per side.
Garnish with thinly sliced green onions, if desired.
Serve whole pieces as a main course or cut into smaller pieces, using kitchen shears, for a starter or party nibble.
Or, bake in oven at 375F for 20 minutes. Broil for 5 minutes.
Reduce marinate into a glaze to grilled meat.
Update: The reduced marinate turned to a very unappetizing muddy brown color, and tasted too sweet. I wouldn't do this again.
Thursday, October 25, 2012
Chap Chae - Korean Noodles with Beef and Vegetables
I made this recipe without the beef so my Dad, a vegetarian, can try it. It was good. The sauce was a bit too sweet as is.
My older sister wanted a light taste with less sauce. My younger sister thought the lack of sauce made the dish a bit tasteless. My Dad thought the sauce too sweet, etc. My Mom is always the sweetest person in the world who never says anything unpleasant, so she didn't comment at all. It's hard to make a new dish in a house full of critics. But I love them all. :-)
3 Tbsp canola oil
2 cups julienned carrots
Kosher salt and freshly ground white pepper, to taste
2 cups thinkly sliced onions
1 cup julienned red bell pepper
1 cup julienned button mushrooms
1 cup julienned filet mignon
1 clove garlic, minced
1/2 cup soy sauce
1/2 cup sugar
16 oz dried Korean sweet potato noodles (called dangmyeon), soaked in boiling hot water until al dente.
2 Tbsp toasted sesame oil
2 Tbsp thinly sliced scallions
1 Tbsp toasted sesame seeds

Heat 1 Tbsp oil in a skillet over medium high heat; Add carrots. Season with salt and pepper; cook; stirring until half-tender, about 3 minutes.
Transfer to a large bowl; repeat with 1 Tbsp oil, onions, peppers, and mushrooms.
Wipe skillet clean, heat remaining oil. Add steak and garlic, cook until browned, about 4 minutes.
Add soy sauce and sugar; cook until sugar dissolves.
Pour over vegetables in bowl, add noodles and sesame oil, and toss.
Garnish with scallions and sesame seeds.

I didn't have time to take a picture of the final product, because everyone was already hungry, so all you have are the pictures of the julienned vegetables.
Remember to drain the vegetables before mixing or the dish could be too wet (like my husband did the next day). This time, I didn't want to take a picture! :)
My older sister wanted a light taste with less sauce. My younger sister thought the lack of sauce made the dish a bit tasteless. My Dad thought the sauce too sweet, etc. My Mom is always the sweetest person in the world who never says anything unpleasant, so she didn't comment at all. It's hard to make a new dish in a house full of critics. But I love them all. :-)
3 Tbsp canola oil
2 cups julienned carrots
Kosher salt and freshly ground white pepper, to taste
2 cups thinkly sliced onions
1 cup julienned red bell pepper
1 cup julienned button mushrooms
1 cup julienned filet mignon
1 clove garlic, minced
1/2 cup soy sauce
1/2 cup sugar
16 oz dried Korean sweet potato noodles (called dangmyeon), soaked in boiling hot water until al dente.
2 Tbsp toasted sesame oil
2 Tbsp thinly sliced scallions
1 Tbsp toasted sesame seeds

Heat 1 Tbsp oil in a skillet over medium high heat; Add carrots. Season with salt and pepper; cook; stirring until half-tender, about 3 minutes.
Transfer to a large bowl; repeat with 1 Tbsp oil, onions, peppers, and mushrooms.
Wipe skillet clean, heat remaining oil. Add steak and garlic, cook until browned, about 4 minutes.
Add soy sauce and sugar; cook until sugar dissolves.
Pour over vegetables in bowl, add noodles and sesame oil, and toss.
Garnish with scallions and sesame seeds.

Remember to drain the vegetables before mixing or the dish could be too wet (like my husband did the next day). This time, I didn't want to take a picture! :)
Peanut Butter Cookies
I love a good peanut butter cookie, and I've been searching for the right recipe for me. I love Central Market's PB cookie! To me, it embodies what a perfect PB cookie should be: crispy on the edge, soft and chewy in the middle, crunchy peanuts, full of PB flavor, but with enough flour to make it a cookie. I don't want a flourless PB cookie. So I've tried a few PB cookie recipes, and while they were good, they weren't perfection.

This PB cookie recipe is near perfection, but it's pretty close to what a CM PB cookie is. I would love a CM PB cookie recipe, if anyone knows and cares to share. Please.
3 cups flour
2 tsp baking powder
1 tsp kosher salt
1 cup sugar
1 cup packed dark brown sugar
12 Tbsp unsalted butter, softened
2 eggs
1 cup peanut butter (I used Crunchy Jif PB)
2 tsp vanilla extract
2 cups peanut butter chips
Heat oven to 350F.
Whisk flour, baking powder and salt together in a bowl.
Beat sugars and butter together until pale and fluffy, about 3 minutes.
Add eggs one at a time, beating well after each, until smooth.
Add peanut butter and vanilla; beat until smooth.
Add flour mixture, beat until combine.
Fold in the peanut butter chips.
Bake for about 12 minutes. Actually I baked for about 15 minutes at 325F convection, but I think my cookies were a bit more done than I'd like. The edges were very good, but the middle were not soft and chewy. However, I think the cookies were underdone at 12 minutes. I portioned the cookies using the 1-Tablespoon scoop. I will make bigger cookies next time, and keep baking time at 15 minutes.

Also the original recipe didn't call for the peanut butter chips, but I know CM PB cookies have the chips as one of the ingredients, so I added the chips. I think it made a world of difference to these cookies.
However, one of my picky friends didn't rave for the cookies. But he didn't like the CM PB cookies either. I just think he doesn't have the sophistication to appreciate a good cookie when he stumbles upon one. :)

Bánh Bò Hấp (Steamed Sponge Cake)
I tried to make this 'cake' before, but failed miserably. Other recipes didn't give enough time for fermentation. I went a bit overboard with the colors. My nieces call these Easter cakes.

1 1-lb (16 oz) bag of rice flour.
1 tsp sugar
1.5 tsp instant yeast
2 cups lukewarm water
1.5 cup (1 can) coconut milk
1.5 to 2 cups sugar, depending on your preference for sweet.

You should see the honeycomb rising from cake bottom.
Since this recipe used all rice flour, my sister complained that it lacked the typical chew in Vietnamese dessert. So when I made it the second time, I added about 1/3 to 1/2 cup of tapioca starch. I've seen some recipes call for 50g of tapioca flour, but my kitchen scale ran out of battery, so I just guessimated. The cake came out dense and heavy, lacking the fluffy soft texture of the steamed cake. Did not like.

1 1-lb (16 oz) bag of rice flour.
1 tsp sugar
1.5 tsp instant yeast
2 cups lukewarm water
Mix together until smooth. Let mixture sit in covered container for 5 - 10 hours.1 cup water
1.5 cup (1 can) coconut milk
1.5 to 2 cups sugar, depending on your preference for sweet.
Put everything into saucepan over medium heat. Warm mixture just until sugar dissolved. Do not boil (because it'll take you longer to cool it down). Cool mixture down to 100F - 110F.
Combine coconut milk mixture into flour mixture. Mix well. Let mixture sit for another hour. You should see some bubbles rising on top.
Divide batter. Add food color if desired.
Lightly oil the molds. Steam molds until hot before pouring the mixture in. Steam for 8-10 minutes, if using small molds like I did above, until the top surface is solid. If using pie pan, steam for 25-30 minutes.

You should see the honeycomb rising from cake bottom.
Since this recipe used all rice flour, my sister complained that it lacked the typical chew in Vietnamese dessert. So when I made it the second time, I added about 1/3 to 1/2 cup of tapioca starch. I've seen some recipes call for 50g of tapioca flour, but my kitchen scale ran out of battery, so I just guessimated. The cake came out dense and heavy, lacking the fluffy soft texture of the steamed cake. Did not like.
Spaghetti Alla Primavera
I tried this recipe, and liked it so much that I made it three times in a month. I loved the taste: clean, light, yet complex. I don't love pasta that's too saucy, not something with too much cream or cheese, but I liked this dish very much. There was just enough cream and cheese to cling on the pasta, and no sauce pooling at the bottom of the dish.
I will definitely make this again. But for my husband and sons, I might have to add grilled chicken or something. They kept asking, "No meat?"
6 Tbsp olive oil
3 gloves garlic
6 oz button mushrooms, quartered
1 cup asparagus tips, blanched
1 cup small broccoli florets, blanched
1/2 cup frozen peas, blanched
1 small zucchini, quatered lengthwise, cut to 1" lengths, blanched
1 lb. spaghetti, cooked al dente
1 cup heavy cram
2/3 cup grated Parmesan
2 Tbsp unsalted butter
Kosher salt, to taste
1 cup grape tomatoes, halved
2 Tbsp thinly shredded basil
1/2 cup lightly toasted pine nuts
I added a lot more vegetables called for in the recipe, and I still didn't think I had enough vegetables. I used 1 lb. asparagus, 1 full head of broccoli, 2 zucchini, 2 squash for my recipe.
Heat 5 Tbsp oil in a skillet over medium heat. Add 2/3 of the garlic, cook until golden. Add mushrooms; cook until golden, about 3 minutes. Add vegetables, cook for 3 minutes. Add pasta, cream, Parmesan, and butter; season with salt. Toss to combine. Transfer to a platter.
Bring 1 Tbsp olive oil and garlic, tomatoes, and basil to simmer over medium heat. Pour over pasta. Garnish with pine nuts.
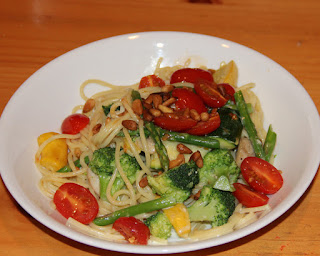
It was so good that we started eating, and I forgot about taking pictures. I've been very lazy with taking pictures lately, so I hardly have any picture of the prep. Sometimes, the only pictures I might have are those taken with my old clunky blackberry.
Saturday, October 20, 2012
Cong You Bing - Scallion Pancakes
Scallion Pancakes
2 cups flour1 Tbsp baking power
2/3 cup cold water
Process in food processor for 40 seconds. Remove. Set aside.2 cups flour
1 Tbsp salt
2/3 cup boiling water
Process in food processor for 40 seconds. Add cold dough, pulse to combine, about 35 seconds.
Transfer to a floured surface, knead until smooth, about 4 minutes. Transfer to greased bowl, let sit for 2 hours.2 Tbsp toasted sesame oil
1-1/2 cups thinly sliced scallions
1 tsp crushed red chili flakes
1/2 tsp ground white pepper
Divide dough into 6 equal parts, roll out in rectangles thinly. Brush with sesame oil, scallions, chili flakes and white pepper. Roll tightly like jelly roll. Then coil like a snail, tucking end underneath. Flatten coil into a disk. Roll out into 5" circle.

Let pancakes sit for about 10 minutes.

Heat 2 tsp canola oil in skillet. Cook, swirling skillet and turning once, until golden about crisp, about 10 minutes.

I made this dish twice.
The first time, I think I mistakenly used only 1 teaspoon of baking powder instead of 1 tablespoon as called for in the recipe. However, it turned out better.
The second time, I followed the recipe, and the pancake was a bit bitter / metallic. Did not like as much. Or maybe the novelty wore off, so I wasn't as enamored with it as the first time.
Thursday, September 13, 2012
Artisan Bread in 5 minutes
Follow my success with the focaccia bread, I started reading more about bread making.
Someone mentioned the Artisan Bread in Five Minutes a Day.
Read it.
No, not the entire book. Just enough to get started on the recipe.
And I got so confused.
I now got into the habit of weighing my ingredients, not measuring them anymore.
So I tried to convert the recipe into weight.
The author's conversion in this article on his website is different from other source(s). And I ran out of AP flour and wanted to use bread flour, but not sure of what changes I needed to do. So I was glad that he provided the hydration percentage.
For most unbleached AP flours (Gold Medal, etc.): 75% hydration
King Arthur AP: 81% hydration
Bread flour: 83% hydration
High-gluten flour: 85% hydration.
So I started my dough with...
700g bread flour
581g warm water
2 teaspoons yeast (I didn't use the whole 1.5 Tablespoons yeast called for in the recipe).
2 teaspoons salt.
The dough has been sitting out for over an hour.
Will bake it tomorrow and update.
I baked it. It was.. a bit of a downer. It wasn't bad, but wasn't great. I didn't even bother to take a picture of the inside. It wouldn't be qualified for "artisan."

The slashing was horrible I know. It was my first time slashing, and I didn't have a sharp knife so I used a steak knife.
I also use the dough to make Cinnamon Rolls. Again, disappointing.
Not sure if I would try it again.
The Best Focaccia Bread Ever
This. was. the best focaccia ever.
So it was the best focaccia I've baked.
And it was the first focaccia I've ever baked.
Still, it has the potential to be the best focaccia in the universe.
Except it was a bit salty. Okay, really salty!
But that was because I used the Alessi Coarse Sea Salt, which made all my dishes so salty.
Who says Mediterranean sea salt is less salty? Next time, I'll stick with Diamond Kosher Salt.
Could it be that I used 1 tsp salt instead of the 1/2 teaspoon called for in the recipe? Hmmm...
Again, the focaccia was so good. And so easy.
So easy that I could bake it every day. But that would mean gaining one pound in a day. 7 lbs in a week. 30 lbs in a month. Yikes!
It required no kneading. My kind of bread. I've heard of no knead bread before, but never paid any attention to it. Until now.
So good that I'm creating a post for it. So I can keep it for myself. And for posterity.

See? Doesn't it look gorgeous?
And I lifted this recipe from CI-2010Sep&Oct. Cryptic eh? Well that was intentional.
On to the recipe already!
1/3 cup (2-2/3 ounces) warm water (100-110F)
1/4 teaspoon instant or rapid-rise yeast.
Combine flour, water and yeast in a large bowl. Stir to combine. Cover bowl with plastic wrap and let stand at room temperature (70F) overnight (8 - 24 hours). Use immediately or store in refrigerator for up to 3 days (allow to stand at room temp 30 minutes before proceeding with recipe).
1-1/4 cups (10 ounces) warm water (100-110F)
1 teaspoon instant or rapid-rise yeast
Kosher salt (don't use Alessi Coarse Sea Salt!)
4 tablespoons extra-virgin olive oil
2 tablespoons chopped fresh rosemary leaves
Stir flour, water and yeast into biga until uniform. Cover with plastic wrap and let raise at room temp for 15 minutes.
Sprinkle 2 teaspoons salt over dough, stir into dough until thoroughly incorporated.
Cover with plastic wrap and let raise at room temp for 30 minutes. (#1)
Fold dough. Lift edge and and fold toward middle. Turn bowl. Fold. Turn bowl. Fold. All around, about 8 turns.
Cover with plastic wrap and let rise another 30 minutes. (#2)
Repeat turning and folding.
Cover with plastic wrap and let rise another 30 minutes. (#3)
Repeat turning and folding.
Adjust oven rack to upper-middle position. Place baking stone on rack. Heat overn to 500F at least 30 minutes before baking.
Transfer dough to a lightly floured counter. Lightly dust top of dough with flour and divide in half. Shape each piece of dough into 5-inch round by gently tucking under edges.
Coat two 9-inch round cake pans with 2 tablespoons olive oil each.
Sprinkle each pan with 1/2 teaspoon kosher salt.
Place round of dough in pan, top side down; slide dough around pan to coat bottom and sides, then flip over.
Repeat with second piece of dough.
Cover pans with plastic wrap and let rest for 5 minutes.
Using finger tips, press dough out toward edges of pan. (If dough resists stretching, let it relax for 5 to 10 minutes before trying again.)
Using dinner fork, poke surface of dough 25 or 30 times, popping any large bubbles.
Sprinkle rosemary evenly over top of dough.
Let dough rest until slightly bubbly, 5 to 10 minutes.
Place pans on baking stone and reduce oven temperature to 450 degrees.
Bake until tops are golden brown, 25 to 28 minutes, switching placement of pans halfway through baking.
Transfer pans to wire rack and let cool 5 minutes.
Remove loaves from pan and return to wire rack.
Brush tops with any oil remaining in pan.
Let cool 30 minutes before serving.
I baked the focaccia using the lazy steaming method. I heated roasting pan with the baking stone, and after placing the cake pans onto the stone, I also threw in a few ice cubes into the roasting pan to create stream. That supposed to do something good to the bread, but I forgot exactly what.
My son commented that the baked (burnt?) rosemary smelled like burnt glue. Must the the sap from the fresh rosemary. Next time, I will mix the rosemary with the olive oil before spreading it on so the rosemary won't burn as bad.
My dough was very wet and sticky. But the focaccia turned out beautifully. The wet dough created those big holes in the bread.
Note: The hydration percent of the dough is 84% (the weight of water relative to the weight of flour).
So it was the best focaccia I've baked.
And it was the first focaccia I've ever baked.
Still, it has the potential to be the best focaccia in the universe.
Except it was a bit salty. Okay, really salty!
But that was because I used the Alessi Coarse Sea Salt, which made all my dishes so salty.
Who says Mediterranean sea salt is less salty? Next time, I'll stick with Diamond Kosher Salt.
Could it be that I used 1 tsp salt instead of the 1/2 teaspoon called for in the recipe? Hmmm...
Again, the focaccia was so good. And so easy.
So easy that I could bake it every day. But that would mean gaining one pound in a day. 7 lbs in a week. 30 lbs in a month. Yikes!
It required no kneading. My kind of bread. I've heard of no knead bread before, but never paid any attention to it. Until now.
So good that I'm creating a post for it. So I can keep it for myself. And for posterity.

And I lifted this recipe from CI-2010Sep&Oct. Cryptic eh? Well that was intentional.
On to the recipe already!
Biga
1/2 cup (2-1/2 ounces) unbleached all-purpose flour1/3 cup (2-2/3 ounces) warm water (100-110F)
1/4 teaspoon instant or rapid-rise yeast.
Combine flour, water and yeast in a large bowl. Stir to combine. Cover bowl with plastic wrap and let stand at room temperature (70F) overnight (8 - 24 hours). Use immediately or store in refrigerator for up to 3 days (allow to stand at room temp 30 minutes before proceeding with recipe).
Dough
2-1/2 cups (12-1/2 ounces) unbleached all-purpose flour, plus extra for shaping1-1/4 cups (10 ounces) warm water (100-110F)
1 teaspoon instant or rapid-rise yeast
Kosher salt (don't use Alessi Coarse Sea Salt!)
4 tablespoons extra-virgin olive oil
2 tablespoons chopped fresh rosemary leaves
Stir flour, water and yeast into biga until uniform. Cover with plastic wrap and let raise at room temp for 15 minutes.
Sprinkle 2 teaspoons salt over dough, stir into dough until thoroughly incorporated.
Cover with plastic wrap and let raise at room temp for 30 minutes. (#1)
Fold dough. Lift edge and and fold toward middle. Turn bowl. Fold. Turn bowl. Fold. All around, about 8 turns.
Cover with plastic wrap and let rise another 30 minutes. (#2)
Repeat turning and folding.
Cover with plastic wrap and let rise another 30 minutes. (#3)
Repeat turning and folding.
Adjust oven rack to upper-middle position. Place baking stone on rack. Heat overn to 500F at least 30 minutes before baking.
Transfer dough to a lightly floured counter. Lightly dust top of dough with flour and divide in half. Shape each piece of dough into 5-inch round by gently tucking under edges.
Coat two 9-inch round cake pans with 2 tablespoons olive oil each.
Sprinkle each pan with 1/2 teaspoon kosher salt.
Place round of dough in pan, top side down; slide dough around pan to coat bottom and sides, then flip over.
Repeat with second piece of dough.
Cover pans with plastic wrap and let rest for 5 minutes.
Using finger tips, press dough out toward edges of pan. (If dough resists stretching, let it relax for 5 to 10 minutes before trying again.)
Using dinner fork, poke surface of dough 25 or 30 times, popping any large bubbles.
Sprinkle rosemary evenly over top of dough.
Let dough rest until slightly bubbly, 5 to 10 minutes.
Place pans on baking stone and reduce oven temperature to 450 degrees.
Bake until tops are golden brown, 25 to 28 minutes, switching placement of pans halfway through baking.
Transfer pans to wire rack and let cool 5 minutes.
Remove loaves from pan and return to wire rack.
Brush tops with any oil remaining in pan.
Let cool 30 minutes before serving.
My son commented that the baked (burnt?) rosemary smelled like burnt glue. Must the the sap from the fresh rosemary. Next time, I will mix the rosemary with the olive oil before spreading it on so the rosemary won't burn as bad.
My dough was very wet and sticky. But the focaccia turned out beautifully. The wet dough created those big holes in the bread.
Note: The hydration percent of the dough is 84% (the weight of water relative to the weight of flour).
Wednesday, July 18, 2012
Staycation Destinations - Houston Metropolian
I saw this listing in the Fort Bend Parent magazine for staycation destinations in Houston area, and I just have to keep this list somewhere that I can refer to later.
I considered saving it as a document on my PC, as an email, as a note on my blackberry, but I'm sure it'll be lost among the thousand documents I have. My blog is the one place that's very sparse. Besides, I can easy share the list with everyone else.
This would be a list of places I want to take my kids to. I'm going to give myself until end of Summer of 2013 to cover all the destinations below.
CENTRAL
- BBVA Compass Stadium. www.houstondynamo.com. 713.276.7500
- Children's Museum. http://www.cmhouston.org/. 713.522.1138
Free general admission every Thursday from 5-8 pm.
Free general admission on every first Sunday of the month.
Admission: Adult/Children 1+: $9
Annual membership $85 Family or $104 Family Plus.
- Discovery Green. http://www.discoverygreen.com/. 713.400.7336
- Downtown Aquarium. http://www.aquariumrestaurants.com/. 713.223.3474
- Hermann Park. www.hermanpark.org. 713.524.5876
- Houston Museum of Natural Science. www.hmns.org. 713.639.4629
Free general admission every Thursday from 3-6pm (summer) or 2-5pm (winter).
Admission:
Permanent Exhibit: Adult: $15. Child (3-11): $10.Planetarium or Butterfly Center: Adult: $8. Child: $7.
Giant Screen Theater: Adult: $11. Child: $9.
- Houston Zoo. http://www.houstonzoo.org/. 713.533.6500
Free every first Tuesday of the month from 2pm - closing from September 2012 - May 2013. (Free admission cancelled for July & August 2012).
- Main Street Theater. www.mainstreettheater.com. 713.524.6706
- Miller Outdoor Theather. http://www.milleroutdoortheater.com/.
- Minute Maid Park. http://www.houston.astros.mlb.com/. 713.529.8000
- The Health Museum. http://www.thehealthmuseum.org/. 713.521.1515
Free general admission every Thursday from 2-5pm.
- The Museum of Fine Arts Houston. http://www.mfah.org/
Free general admission every Thursday from 10am - 9pm.
- The Orange Show. http://www.orangeshow.org/. 713.926.6368
- Market Street - The Woodlands. http://www.marketstreet-thewoodlands.com/. 281.419.4774
- Old MacDonalds Farm. http://www.oldmacdonaldshumble.com/. 281.446.4001
- Old Town Spring. http://www.oldtownspring.com/. 281.353.9310
- Splashtown. http://www.splashtownpark.com/. 281.355.3300
- The Depot in Tomball. http://www.ci.tomball.tx.us/. 281.251.5484
- The Woodlands Children's Museum. http://www.woodlandschildrensmuseum.org/. 281.465.0955
- Brazos Bend State Park. www.brazosbend.org. 979.553.5101
- Constellation Field. http://www.sugarlandskeeters.com/. 281.240.4487
- George Observatory. http://www.hmns.org/. 281.242.3055
- George Ranch Historical Park. http://www.georgeranch.org/. 281.343.0218
- Houston Museum of Nature Science at Sugar Land. http://www.hmns.org/.
- La Centerra at Cinco Ranch. www.lacenterra.com. 281.395.5533
- Mary Jo Peckham Park. www.pct3.hctx.net. 281.395.5533
- Oil Ranch. http://www.oilranch.com/. 281.859.1616
- Splashway Waterpark. http://www.splashwaywaterpark.com/. 979.234.7718
- Sugar Land Town Square. http://www.sugarlandtownsquare.com/. 281.276.6000
- The Showboat Drive-In Theather. http://www.theshowboatdrivein.com/. 281.351.5224
- Villago Town Center. www.villagiotowncenter.com 281.363.1336
- Baytown Nature Center. http://www.baytown.org/. 281.932.1972
- LaPorte Wave Pool. www.ci.la-porte.tx.us. 281.470.1966
- Pirates Bay. www.baytown.org/piratesbay. 281.422.1150
- San Jacinto Momument & Battleship Texas. http://www.tpwd.state.tx.us/. 281.479.2431
- Sylvan Beach. http://www.ci.la-port.tx.us/. 281.457.0694
- Armand Bayou Nature Center. http://www.abnc.org/. 281.474.2551
- Bayou Wildlife Park. http://www.bayouwildlifepark.com/. 281.337.6376
- Big League Deams. http://www.bigleaguedreams.com/. 281.316.3400
- Butler Longhorn Museum. www.butlerlonghornmuseum.com. 281.332.1393
- Clear Lake Recreation Center. ww.clcca.org. 281.488.0360
- Froberg's Farm. http://www.frobergsfarm.com/. 281.585.3531
- Kemah Boardwalk. http://www.kemahboardwalk.com/. 281.334.9880
- Pearland Parks. http://www.pearlandparks.com/. 281.412.8900
- Space Center Houston. http://www.spacecenter.org/. 281.996.3200
- Stevenson Park. ci.friendswood.tx.us. 281.996.3200
- West Bay Common School & Children's Museum. http://www.oneroomschoolhouse.org/. 281.554.2994
- Galveston Island Duck Tours. http://www.galvestonducks.com/. 409.621.4771
- Lone Star Flight Museum. http://www.lsfm.org/. 409.740.7722
- Moody Gardens. http://www.moodygardens.com/. 800.582.4673
- Pleasure Pier. http://www.pleasure-pier.com/. 713.850.1010
- Railroad Museum. http://www.galvestonrrmuseum.com/. 409.765.5700
- Rainforest Cafe. http://www.rainforestcafe.com/. 409.744.6000
- Schitterbahn. http://www.schlitterbahn.com/. 409.770.9283
Sunday, April 8, 2012
Domo-Kun Cookies... NOT
My niece Laney wore a cap the other day to her birthday dinner.
It was brown, with a patch of red rectangle, outline on top and bottom with a string of white triangles, lined with braces.
It was weird looking.
And she loved it.
Then my son Ryan wanted one for himself.
With a mustache.
This is what his cap looks like.


The cookies were very tender. I cut them 1/4-inch thick, but they spread so much during baking that the cookies came out pretty thin. The cocoa in the brown part was dominant. And it was salty. There was 1 1/2 teaspoons in the cookies below.

It was brown, with a patch of red rectangle, outline on top and bottom with a string of white triangles, lined with braces.
It was weird looking.
And she loved it.
Then my son Ryan wanted one for himself.
With a mustache.
This is what his cap looks like.

How am I getting so dated? I should have known about Domo-kun. How am I going to be a 'cool' Mom if I don't know these things?
So to redeem my 'cool', I decided to bake Laney somehting Domo-kun theme for her birthday. I settled on the Domo-kun cookies made by Diamond for Dessert.
What a disaster!
The dough was hard to work with. It was soft and sticky. When I left it in the fridge for too long, it got too rigid to shape. Not cold enough and it was sticky. And the dimensions provided made really small cookies. And I didn't know how to shaped the dough to be 1 1/4-inch by 3/4-inch. By the time you put all the pieces together, the dimensions were lost, and the dough took whatever shape it wanted.
So I started eyeballing it, no measurement. It was better, but I was quite frustrated with the dough. The first few cookies might look somewhat Domo-like, but the rest was just pathetic. Consider the amount of work I put in, and the little number of cookies getting out of the whole thing... Disappointed.
When time to bake them, I didn't realize that the cookies would expand so much. That explained the small dimensions given. My cookies came out meshing into each other. But again, by this time, I already gave up the ideas of even trying to decorate the cookies. However, I was hoping that they still taste good since it was a Thomas Keller recipe.

The cookies were very tender. I cut them 1/4-inch thick, but they spread so much during baking that the cookies came out pretty thin. The cocoa in the brown part was dominant. And it was salty. There was 1 1/2 teaspoons in the cookies below.

But they didn't taste too bad actually. My sisters didn't care for them. The kids surely didn't care for them. But they grew on me. I don't usually eat my own baking, except for those noone else wanted to eat, because I couldn't just throw them out.
So I ate a lot of these cookies. Maybe that's why they grew on me. But for sure, I won't be making them again, so no point of getting the recipe.
Saturday, April 7, 2012
Babycakes Cake Pop Maker
I finally bought the Babycakes Cake Pop Maker in March. Yes, I know the 'Cake Pop' trend is almost over, but I never cared for the original cake pop with the thick gooey frosting mixing in cake and shaping into round balls. Especially store bought icing. With shortening. Enough said.
And I knew about the Babycakes Cake Pop Maker, but I thought it was just too much hassle, until I went to a cake pop party. Besides, for $20, I can justify for an afternoon activities with my sons and my nieces. But I also got a Tovolo pancake pen for $10. It was getting expensive, especially I didn't have any coupon with me.
Before starting, I consulted my best friend, Google, about what to do. Some tips were helpful, such as using the pancake pen for filling the holes, unplug the maker while filling, coat the holes lightly with oil to prevent sticking, etc.
I started out with a basic vanilla recipe from the booklet that came with the maker. It turned out well. Some were round, some were not, and they were all eventually consumed.
Then I tried it out with a cake mix since I read that cake mix would work as well. I wanted a lemon flavor but was too lazy to zest the lemons (that I have not bought), so I got a Duncan Hines Lemon Supreme cakemix. Prepared per instructions, and baked using the Cake Pop Maker.
I went back to the babycakes recipe and tried the lemon one with lemon zest and lemon juice. Good flavor. But again, a bit drier than cake mix. Tried dipping. The first time, I over heated the candy melt and thus couldn't get it to flow smoothly, no matter now much shortening I added. I googled and googled and saw that a lot of people were asking the same questions I did - why couldn't I get the smooth shiny texture like others?
I tried again, heating in 20 seconds interval on DEFROST, stirred and stirred, and erred on the side of caution so it wouldn't be overheated. I was able to create that smooth and shiny texture. However, by the time the candy got coated and excess dripped off, it was too dry to evenly coated the sprinkles on. I still needed to play with it a bit more.
And I knew about the Babycakes Cake Pop Maker, but I thought it was just too much hassle, until I went to a cake pop party. Besides, for $20, I can justify for an afternoon activities with my sons and my nieces. But I also got a Tovolo pancake pen for $10. It was getting expensive, especially I didn't have any coupon with me.
Before starting, I consulted my best friend, Google, about what to do. Some tips were helpful, such as using the pancake pen for filling the holes, unplug the maker while filling, coat the holes lightly with oil to prevent sticking, etc.
I started out with a basic vanilla recipe from the booklet that came with the maker. It turned out well. Some were round, some were not, and they were all eventually consumed.
 |
| This is the basic vanilla mix that came with the instruction booklet. I didn't fill the wells / holes full enough. |
 |
| Thus the cake pops came out flat on top. |
 |
| Then I tried with the cake mix. This was the cake mix I used. You will see that the 'moist' cake mix might not be the best choice for the cake pop maker. |
 |
| The cake pops were full and well rounded when just baked. |
 |
| But soon deflated with a cake mix. The cake were too fluffy and soft and couldn't hold the structure. Those cake pops made from the recipes from babycakes have firmer, drier and more dense, thus can keep their shapes better. |
 |
| And finally, the perfect cake pop. Haa, just kidding! I just flipped the bottom over. This must be how the covered picture from the box was taken. |
I went back to the babycakes recipe and tried the lemon one with lemon zest and lemon juice. Good flavor. But again, a bit drier than cake mix. Tried dipping. The first time, I over heated the candy melt and thus couldn't get it to flow smoothly, no matter now much shortening I added. I googled and googled and saw that a lot of people were asking the same questions I did - why couldn't I get the smooth shiny texture like others?
I tried again, heating in 20 seconds interval on DEFROST, stirred and stirred, and erred on the side of caution so it wouldn't be overheated. I was able to create that smooth and shiny texture. However, by the time the candy got coated and excess dripped off, it was too dry to evenly coated the sprinkles on. I still needed to play with it a bit more.
 |
| My cake pops. I just tried sprinkles with a few just to experiment. And actually, by this time, I was pretty lazy and unmotivated to do anything creative. |
 |
| This is my best one. I put the sprinkles in the bowl and dip it in right after. You can see the candy was dried already. |
Thomas the Tank Engine Cupcakes with Marshmallow Fondant
My 2-yo nephew loves trains, especially Thomas the Tank Engine and all his friends. For his birthday, I wanted to make the cupcakes that his Mom liked, the same recipe that I made last month for the tie-dyed cupcakes. However, for decoration, I wanted to do a train theme. With my limited ability as a baker and a decorator, I know that anything 3D is out. I googled for ideas, combined and simplified and came up with the design below, which I did mostly with the three round fondant cutters I have. I also tried the marshmallow fondant recipe for the very first time to make these cupcake toppers.
MARSHMALLOW FONDANT
16 ounces white mini-marshmallows
4 tablespoons water
2 pounds confectioners sugar / powdered sugar
1/2 cup Crisco shortening (for coating your hands with).
I halved the recipe and still had plenty of fondant leftover.
Microwave the marshmallows and water in 30 seconds increment, stir in between, until melted. It shouldn't take more than 2 minutes.
Mix the powdered sugar in slowly, stirring at first, until too thick to stir. Grease your hand with Crisco and knead the rest of powdered sugar in until the mixture is soft and pliable.
I thought that I would have to knead a lot, but it came together quickly enough.
I used Wilton gel colors to mix in and color my fondant. It worked out well.
People claimed that the marshmallow fondant tastes better than store bought fondant, I didn't even taste test it since I don't care for marshmallow nor powdered sugar nor shortening. However, my son did, and he seemed to not mind it.
I initially made a lot of gray and black fondant thinking of a different design, but that was tedious and took so long, so I decided on this design. As usually, my son Ryan is my trusted judge, and when he declared that the design "looked really good Mommy," I knew I had a winner.


I didn't make enough green and blue fondant, and past midnight, I didn't want to yet start another batch. I still had some yellow and red left, with tons and tons of gray and black, so Ryan said let's do Angry Birds cupcakes. He gave me some ideas for the design, and he even cut out the hair for the head and the tail. We ended up liking the Angry Birds a lot.

The mouth below is too big. Make it smaller next time.

Monday, March 5, 2012
The 80/10/10 Diet and Lobster Bisque
One week. 11 pounds, uhm, maybe 12, to go. I’d settle for 2 pounds.
The Belly Fat Cure didn’t work. True, I didn’t do anything. Still. It didn’t work.
Meanwhile, I checked out “The 80/10/10 Diet” by Dr. Douglas Graham. Did you know the 80 stand for minimum 80% of carb? Awesome! The other two 10s represented maximum 10% of protein and 10% of fat. Hmm, so little fat? Carb wouldn't taste any good without the fat!
Then, I learnt that the carb weren't my type of carb. As in all-purpose flour, cake flour, or bread flour. The 80% carb referred to wholesome, raw, UNCOOKED food. Which are mostly fruits. Bummer! Personally, this diet was just too ‘fruity’ for me. Nix!
So all last week, I spent my team reading diet books while munching on cupcakes, macarons, mango mousse, Costco’s Tuxedo chocolate mousse cake (heaven!), cake pops, and cream puffs. That didn't help my waistline, or the original 10 pounds I was aiming to get rid of.
Desperate time calls for desperate measure. I need more than a diet, I need willpower as well. Thus, “The Seven-Day Total Cleanse: A Revolutionary New Juice Fast and Yoga Plan to Purify Your Body and Clarify the Mind” by Mary McGuire-Wien seems like the perfect solution for me.
Talking about liquid diet, I made lobster bisque for the first time last weekend. It was so good I made it twice! Actually, I was only helping the first time.
This lobster bisque tasted so much better than the one I tried at Austin’s Eddie V. The bisque was so salty that I quit after one spoon. So they replaced with the crab and corn chowder. Yet again, I couldn’t swallow than two spoons of the chowder either. They ended up not charging me for the soup. Maybe it was just my luck that the chef just had an off day.
LOBSTER BISQUE
2 medium onions, diced
2 medium carrots, diced
1 bulb of fennel, diced
2 tablespoons butter
2 bay leaves
1 teaspoon paprika
2 tablespoons full of tomato paste
2 shrimp bouillon cubes + 8 cups of water (or 8 cups of lobster liquid)
3 tablespoons beurre manie (as needed)
2 cups heavy cream
½ cup sherry or cognac (or as needed)
I’m writing this recipe from estimation since we didn’t measure anything when we made the bisque.
I’m assuming that you already know how to boil the lobsters. Something along the line of immersing them in boiling water for about 8 minutes if your lobster is about 1 – 1.5 lbs. Depending on the size of your pot and the number of lobsters you are boiling, add or subtract a couple minutes.
Reduce the boiling water to about 10 cups. Remove lobsters’ heads, smash it however you can and put the heads back into the boiling water to extract as much juice out of the lobster as possible. Use this water for your bisque. However, you could take the lazy route and use shrimp bouillons instead. The flavor wouldn’t be as good.
Saute the diced onions, carrots and fennel with 2 tablespoons of butter. Add 2 bay leaves and 1 teaspoon of paprika into the vegetable mixture. Cook on medium heat until the vegetables are soft, and the onions turn translucent. Add 2 tablespoons tomato paste, the 2 shrimp bouillon cubes and 8 cups of water. (If you have the lobster liquid above, use that instead.) I’m guessing that we put in about 8 cups of liquid, but it could be more or less, depending on how many people you have to serve.
Continue cooking until the vegetables are cooked really well. Remove the bay leaves. Puree the mixture. Strain. (I didn’t strain the first time, and it was still awesome, not as smooth as a bisque should be. If you strive to impress, strain.)
Add the beurre manie slowly, one tablespoon at a time, until thicken. I don’t remember how much I used really, about 2 tablespoons maybe, and you might like your soup thicker than mine, so adjust as needed.
Add the heavy cream. Again, depending on how rich you want your bisque. If you want it lighter, you might want to use half-and-half instead. Mix well, simmer for a few minutes. Taste and adjust seasonings as needed. I didn’t need to add anything else as the lobster boiling water was salted already.
To serve, ladle soup into bowls. Pour about a teaspoon (or a tablespoon, or two, depending on whom you serve it to) of sherry or cognac on top. If you are lucky enough to still have any lobster meat left at this point, put in the middle of the bowl. Serve.
Wednesday, February 29, 2012
10 things to do at Brazos Bend State Park

- Petting snakes
and alligators.
- Climbing trees.
- Rolling down the
hill and getting all dizzy and muddy.
- Riding a bike
along the nature trails, getting lost and too tired to pedal back.
- Spotting herons
and ravens and pretend that they are talking to you.
- Getting pooped
on while napping innocently on your stroller.
- Picking flowers
for your Mom and your Aunts so they can compete to see who has the biggest
pile.
- Having a picnic,
eating Popeye's fried chicken and drinking Starbucks instant iced coffee.
- Gathering sticks
and see who has the biggest one.
- Feeding the coin
vortex and catching it before it falls in so you can replay the same coin
again. You can only do this on the day there’s no one around.
Tuesday, February 28, 2012
You get what you pay for - Azuma Sushi & Robata Bar
Lunch time. Where to do? Such ‘weighty’ decisions to be made each day.
Today, Groupon Now helped me make a choice!
$20 for $40 worth of food at Azuma Sushi & Robata Bar.
Checked out their menu online. The appetizer menu looked so good: cold soft tofu, grilled whole squid, pork belly - Berkshire pork belly, tofu skin, egg, shimeji mushrooms, Japanese mustard. They had me at pork belly! I still have my pork belly obsession after trying it at South City Kitchen in Atlanta.
We wanted to try their robata (Japanese grill) dish, so we ordered the Combo 6 kinds ($16) with gesso squid, caledonia shrimp, pork belly, angus new york strip, shiitake mushroom, and shishito pepper.

An order of Crazy Irishman Roll ($12) of salmon, tuna, avocado, green soybean paper flash fried, spicy mayo, unagi sauce, green onions, and masago.

And one order of Azuma Beef ($17) – angus new york strip simmering in iron konro.

We must order at least of $40 worth of food! Yes, we are on a ‘diet.’
The roll was the best dish we ordered, but even so, it was nowhere comparable to Kaneyama’s. The wasabi had no kick. At all. I ate the raw wasabi and nothing, no pungent, no tingling, just like green flour paste. Yuck!
On the robata, I liked the grilled squid the most. It was crunchy with just a bit of chew, neutral flavor. Everything else was so mediocre. The beef was tough and chewy. But most disappointing was the pork belly. Berkshire pork is known for its flavor and tenderness due to its high fat content. These pork pieces were so lean and dry and flavorless and had no fat on it whatsoever. I wondered where the ‘belly’ went.
The Azuma beef was again, tough, chewy with a sweet teriyaki flavor. It’s the worse dish of the meal.
For $17, it tasted worse than any dish on Fufu Cafe‘s $5.50 lunch special. However, unlike Fufu Café, I hope Azuma wouldn’t serve you a dish that they had mistakenly served to another table, let it get cold for 10 minutes, fetched it and tried to serve it to you. When you told them that you wouldn’t eat something that’s been sitting at someone else’s table for 10 minutes, they brought the dish to the back of the restaurant, (spit on it for all you know), brought it back out 30 seconds later, and tried to sell you that it was a new dish, which normally took 20 minutes to steam. Like you would be so stupid not to notice the same dumplings with the same soy sauce stain at the exact same spot on the dish.
While you were disgusted with their tactic, you wouldn’t want to be such a cheapskate making a scene for a $4.50 dish. Principles be damn, so you went ahead and forked up the money to pay for it. What’s more, you wouldn’t even dare stiffing them on their tip because the next time you came there, there might be spittle in your food. And yes, you would go there again because you just couldn’t beat a $5.50 lunch for such awesome greasy artery-clogging food.
But I digressed.
Saturday, February 25, 2012
The Belly Fat Cure and Tie-Dyed Cupcakes
Two weeks. 10 pounds. I’d even settle for 5 pounds.
So I checked out “The Belly Fat Cure” by Jorge Cruise. Gosh it sounded so promising. “Drop 4 to 9 lbs a week without dieting.” My kind of ‘cure.’
Spent the morning skimming though the book. To follow through this program, I would have to limit myself to 15g of sugar and about 120g complex-carb a day. I looked at my morning cup of coffee. Oops, there went the 15g of sugar for today!
I was excited the first 30 minutes reading and looking at pictures of the success stories. Oh I can do this! After all, I don’t have to be on a diet. Just limit my carb intake, and eat everything else. The next 30 minutes brought despair. No “real” dessert! What.so.ever! Guess that’s not the lifestyle for me.
So after sharing the information on the Belly Fat Cure with my sister during lunch, we decided to make cupcakes. The ones that she liked so much before. With the awesome icing. And mango mousse. Maybe we can fill the cupcakes with mango mousse. Well, that ‘diet’ was just doom from the start.
I had to retrace my steps to remember which cupcakes she meant. I’ve made so many, and tried all different recipes. I traced my steps back to The Pioneer Woman blog. I didn’t use her cupcake recipe because she used shortening instead of butter. Reading the comments led me to this cupcake recipe. A good basic white cupcakes recipe. And I’d better post it here so I can refer to it later.
I only made one change from the recipe. I used cake flour instead of AP flour. And I weighted my cake flour.
3/4 cup butter, softened
1-1/2 cups sugar (I cut out 1/2 cup of sugar from the original recipe as I don't like my cake very sweet)
3 large eggs
3 cups (310g) cake flour
3 teaspoons baking powder
1/2 cup milk
1/2 cup water
1/2 teaspoon almond extract
For detail instructions, visit Inside Nanabread's Head.
All ingredients should be at room temperature. Cream butter and sugar. Add eggs, one at a time. Add dry and wet ingredients alternately.
Scrape down, beat mixture in high speed for 30 seconds to make sure everything is mixed in well. The batter made really nice ribbons.
In the latest copy of March 2012 Saveur magazine, the main feature was called Best Cakes Ever. I learnt this tip about mixing the ingredients. “Most home bakers learn not to beat their batter in order to prevent the formation of gluten, which leads to a tougher crumb. While this may be a concern when using all-purpose flour, cake batter is less prone to gluten production. And beating a cake batter for a short period of time actually helps smooth and aerate it. Once the batter is just mixed, beat it on high speed for five seconds. You will notice that it immediately transforms into a smooth emulsion, ensuring that the ingredients are evenly dispersed.”
Using my hand mixer, I beat it for 30 seconds on highest setting.
Oven 350F, I baked mine for 18 minutes.
The original recipe called for 18 cupcakes. They rise very high in oven, but deflated once cooled. I can probably stretch it to make 24 cupcakes. However, I was also trying to do tie-dyed cupcakes, so I wasted some cake batter in all the different bowls.
Scooping cake batter into cupcakes.

Swirl them. I didn’t mix the bottom four cupcakes, and they came out color-blocking.

The middle one is one of the bottom four cupcakes above. The other three were quickly consumed the minute they were out of the oven as my nieces’ first picks.

Cupcake was moist, light and tender. Half of them were gone before I can even make the frosting.

Oh frosting!
That's why we wanted to make cupcakes in the first place. Last time, the icing was so good. But I want to make sure it wasn't just a fluke last time. With me, flukes happen. So I have to try it again before making them for my nephew’s birthday. People outside of my family would be there, who might even eat my baking.
That's the best frosting I've ever had. Well I wouldn't go so far to claim it, but it was quite tasty. Especially if you don’t like the overly sweet, typical buttercream frosting made with butter and confectioner sugar. I’ve read somewhere that the cornstarch in confectioner sugar makes frosting taste ‘off,’ and I couldn’t agree more. Well, maybe except for the cream cheese icing, on carrot cake. Yum!
Anyway, this frosting is quite good, and so easy to make. The first time I made this frosting, I followed the instruction to a T. I waited for the flour and milk mixture to thicken to a brownie consistency. By the time it cooled, it turned into a hard paste, and I couldn’t get it to smooth out enough for the icing, no matter how long I beat. This time, I just thickened it to a cake batter consistency, and when it cooled, it got to the brownie consistency, and my icing came out so much better.
Again, recipe for my reference, and in case the other site goes down. More than likely though, this site will go down first.
5 Tablespoons flour
1 cup milk
1 teaspoon vanilla extract
1 cup butter
1 cup granulated sugar
Mix flour and milk. Thicken on low heat. Cool.
Beat butter and sugar until smooth, which took quite a long time on my hand mixer. The 25-year-old Sunbeam mixer that has been passed down from my Mom has finally died last week. It’s been collecting dust most of the time in the last 25 years though.
Add the flour and milk mixture and mix. Continue mixing. Until you are tired of holding the hand mixer. Or when you worry about your stand mixer overheated. I wouldn’t know. I didn’t mix it that long. I only had one hand-mixer left.
The final masterpiece.

And I meant final. It was the last one left.
Subscribe to:
Posts (Atom)